

Technical
Help
& Education
Glossary Of Terms
Speakers Main Page
How Speakers Work
Choosing Speakers
What's A Woofer?
What's A Midrange?
What's A Tweeter?
Other Speaker Types
More Speaker Types
What's A Capacitor?
Installing A Capacitor
What's A Crossover?
What's An Equalizer?
Speaker Enclosures
Theile/Small Param.
About Power Amps
Installing An Amp
Installation Tips
Power Ratings
Installing/Replacing
Head Units/Receivers
Installing Neon/LED
Eliminating Noise
Use The Right Tools
Manufacturer's
Links
Personal
& Marine
Electronics
Laptop Computers
Cell Phones & PDAs
Portable TV & Video
Electronic Readers
MP3/Music Players
CD
Players/Booms
Earphones/Buds
Digital Cameras
Video
Cameras
Personal GPS
Bluetooth
Calculators
Accessories
Marine
Electronics
Stereo Amplifiers
Stereo Speakers
Stereo Woofers
Enclosed Speakers
TVS & Video
CD/Mp3 Receivers
GPS & Navigation
Fish Finders
Accessories
Home
Stereo &
Office Electronics
Flat
Screen & HD TVs
Surround Sound
Home Theater
DVD Players/Tivo
DVD Recorders
Blu-Ray Devices
Amplifiers/Tuners
Speaker
Systems
Subwoofer Drivers
Midrange
Drivers
Tweeter Drivers
Powered Subwoofers
Outdoor
Speakers
Stereo Accessories
Digital
Photo Frames
Video Game Systems
Game
Accessories
Video Games
Home Security/Alarms
Computer
Products
Desktops & Laptops
Add-Ons/Peripherals
Computer Monitors
Computer Software
Computer Games
Printers &
Scanners
Ink/Specialty Papers
Parts & Components
Computer Supplies
Security/Tech
Support
Auto
Electronics
Amplifiers
Subwoofers
Full-Range Speakers
Midrange Speakers
Tweeters
Power Capacitors
Empty
Enclosures
Loaded Enclosures
CD/Mp3 Receivers
CD Changers
Bass Packages
Car
TV & Video
Satellite
Radio
Bluetooth Wireless
GPS Navigation
Neon/LED Lighting
Radar Detectors
Chrome
Mufflers
Car Alarms/Security
V
AUTO
PARTS STORE
Auto
Wiring &
Accessories
Air Horns
Power
Antennas
Antenna Boosters
A/V Controllers
Bass Blockers
Crossovers
Dynamat
Equalizers
Fans (Cooling)
FM Modulators
Interfaces
Line Converters
Noise Filters
Power Inverters
Power Supplies
RCA Cables
RCA Splitters
Remote Controls
Signal Boosters
Vibration Control
Speaker Grills
Wiring Kits
Click Here For A Wide Selection Of
NEON and LED Automotive Lighting
Kits And Accessories
A Typical Installation

Tools
Needed
Screwgun
w/Phillips head bit
Wire Strippers
Electrical Tape
Please
Read All Instructions That Accompany The Product Carefully Before Installing
Neon
1)
Locate a desired location for tube placement that is away from
all fuel lines, exhaust system, areas of extreme heat, moving parts and
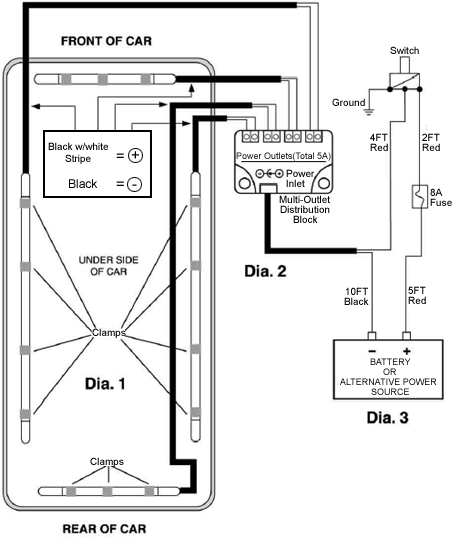
where lifts or jacks are used to raise your vehicle (see Dia. 1).
With nylon clamps, fasten tubes to your vehicle with self-tapping screws. Tubes are marked for proper clamp placement. (4 clamps per 54" tube, 3 clamps per 30" tube)
2) On a flat moisture free area, mount multi-outlet power distribution block that is near your power source (ie: fusebox or battery) and accessible for neon wire lead connections, but away from engine and moving parts.
3) Run neon power wires to distribution block that allows for the least length of wire. Avoid slack, trim off surplus wire from neon tubes before connecting to distribution block. Complete connection of all neon power wires (see Dia. 2) and secure with the provided wire holders. (Allow 2" of straight wire from neon tube before making a bend). In the event where neon power wires need to be lengthened, make sure to insulate connection with black electrical tape to ensure a moisture free connection (wire type: 18GA 12 volt)
4) Refer to wiring diagram for power and switch connection
5) Installation is complete, enjoy!
Thanks
To Street Glow, Inc.
Click
Here For A Wide Selection Of
NEON and LED Automotive Lighting
Kits And Accessories
MAIN
PAGE
GLOSSARY
SPEAKERS:
Choosing
General
Woofers
Miidrange
Tweeters
Full-Range
Full-Range 2
CAPACITORS
CROSSOVERS
EQUALIZERS
Theile/Small
AMPLIFIERS:
About
Installing
Install Tips
Power Ratings
RECEIVERS:
Installing
NEON/LED:
Installing
TOOLS
Home
--
Policies
--
Products
--
Tech
Center
--
Auto
Electronics
--
Home
Electronics
--
Personal
& Marine Electronics
--
Stereo
Tech Info
Website Designed & Maintained by
MetroDirect
Communications
Copyright (c) 2000 - 2009
Electronixwarehouse.com
.
Use of any material appearing on this site without specific written
permission is prohibitied by law.
electronixwarehouse.com
---
logobannerfactory.com
---
bleepthem.com (Political Satire)
---
rlebeaux.com
---
stereotechnicalinformation.com (Stereo
Technical Help)
---
electronixwarehouse.net
---
thespeakerstore.com
---
wmpublishing.com (Help For Writers)
---
barbarathenovel.com
---
cutethenovel.com


